
Antigravity supports configuring MCP from a central location that then makes the tools available in the Antigravity CLI, Antigravity IDE and Antigravity. Either OAuth or Bearer authentication work. See Using AI Agents to Generate MiniLessons to learn more about OAuth and Bearer authentication
Using OAuth
Step 1: Add the Server to mcp_config.json
Antigravity stores MCP definitions either globally for all projects or locally within a specific repository workspace:
- Global configuration: ~/.gemini/config/mcp_config.json
- Workspace-specific configuration: .agents/mcp_config.json (at the root of your project)
Add your Minilesson MCP url under the mcpServers object:
{
  "mcpServers": {
    "moodle-minilesson": {
      "serverUrl": "https://[some-moodle-server]/mod/minilesson/mcp.php"
    }
  }
}
(If your OAuth provider requires a static Client ID/Secret rather than DCR, you can pass them alongside clientId and clientSecret under the server object).
Step 2: Authenticate via OAuth
Once added to your configuration, complete the OAuth flow using either the IDE or the CLI.
Option A: Antigravity IDE (GUI)
- Open the Antigravity editor.
- Open Settings using Cmd + , (macOS) or Ctrl + , (Windows/Linux).
- Navigate to Customizations => Installed MCP Servers.
- Click Refresh to detect changes from your mcp_config.json.
- Locate moodle-minilesson in the list and click the Authenticate button.
- A browser window will open to your Moodle OAuth sign-in screen. Log in and authorize access.
- Copy the authorization code provided by the browser callback, paste it into the Antigravity prompt dialog, and click Submit.
- The status indicator next to the server will turn green/connected.
Option B: Antigravity CLI (agy)
- Open your terminal in your project directory.
- Start an interactive Antigravity CLI session from the command line.
agy
- Once your Antigravity conversation is open, start the interactive MCP manager by running the slash command
/mcp
- Use the arrow keys to highlight moodle-minilesson, navigate to Authenticate, and press Enter.
- Your default browser will launch the Moodle authorization page. Log in and grant permissions.
- Copy the resulting authorization code, paste it into the terminal prompt, and press Enter.
- The status ring will shift to active/connected.
Using Bearer authentication
In Antigravity you need to edit the mcp_config.json file. That might be in your user home folder under:
.gemini/config/mcp_config.json.
But you can also open the folder it is in by visiting Antigravity:
Settings -> Customizations ->Installed MCP servers .. and then clicking on: "Open MCP config"
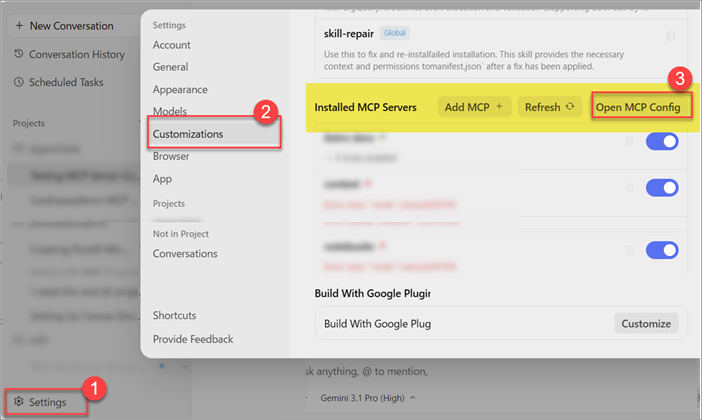
Under the mcpServers entry, add the minilesson mcp entry as shown here.
{
  "mcpServers": {
    "minilesson": {
      "serverUrl": "https://[YOUR_MOODLE_URL]/mod/minilesson/mcp.php",
      "headers": {
        "X-API-Key": "[YOUR_TOKEN]"
      }
    }
  }
}
|