To add Poodll MCP to ChatGPT first choose the client that you want to use. If you are able to use OAuth to connect you have the full range of options. Those are limited however if you can only use bearer authentication. See Using AI Agents to Generate MiniLessons to learn more about OAuth and Bearer authentication
NB Free ChatGPT accounts can not add plugins. And Pro/Personal accounts will require you to turn on developer mode to add custom plugins (which is what you need to do).
Using OAuth
ChatGPT Web
To add Poodll MCP to the ChatGPT web app follow these steps
- Visit ChatGPT.com
- Click Plugins in the left-hand sidebar.
- Click the + (or Create / Add) icon.
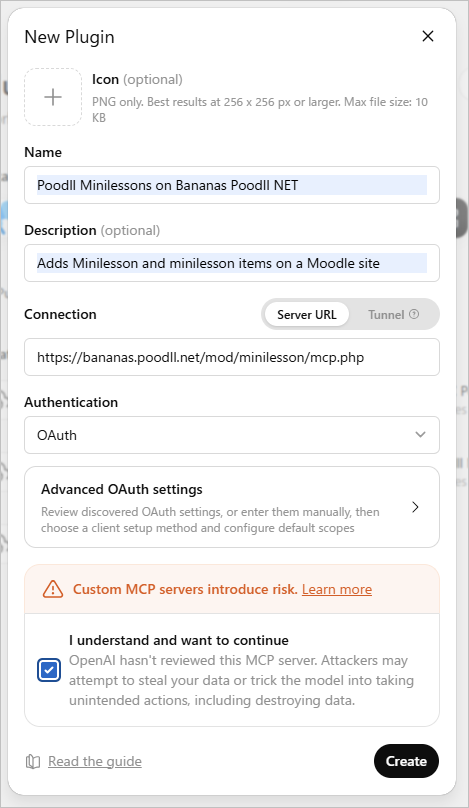
- Enter the name /description and your Minilesson MCP URL
- Under the connection options, select your connection type:
- Connection Method: Remote MCP / HTTP (or SSE depending on your Moodle transport).
- Endpoint URL: https://[some-moodle-server]/mod/minilesson/mcp.php
- Authentication: Select OAuth.
- Complete the Moodle authorization screen when the browser modal pops up.
ChatGPT Desktop App
To add the Poodll MiniLesson MCP to the ChatGPT Desktop application follow these steps:
- Open the ChatGPT Desktop App.
- Go to Settings (or press Cmd + , / Ctrl + ,).
- Navigate to MCP Servers in the sidebar and click Add server.
- Set the configuration details:
- Name: moodle-minilesson
- Type: Select Streamable HTTP (or Remote HTTP).
- URL: https://[some-moodle-server]/mod/minilesson/mcp.php
- Authentication: OAuth
- Click Save and select Restart.
- In the server list, click the Authenticate button next to moodle-minilesson to open the Moodle OAuth login and grant permissions.
- In the chat composer, you can type /mcp to verify the server status and its available tools.
ChatGPT: Mobile App
The ChatGPT mobile client does not have a manual JSON or developer configuration panel in the native mobile settings. But it will also pick up the any MCP tool you registered in the web app.
- Follow the ChatGPT Web steps above to register and authenticate the custom connector on your account.
- Open the ChatGPT mobile app on your phone.
- Start a new conversation, tap the + attachment icon next to the chat bar, and select Tools / Apps.
- Enable the Moodle MiniLesson connector.
OpenAI CLI
If you are interacting with OpenAI models via their local CLI environment:
Open your terminal.
Register the remote HTTP server:
codex mcp add moodle-minilesson --url https://[some-moodle-server]/mod/minilesson/mcp.phpAuthenticate with OAuth:
codex mcp login moodle-minilesson(This opens a browser tab redirecting to your Moodle server; approve access to store the credentials locally).
Check that the server is operational:
codex mcp list
Using bearer authentication
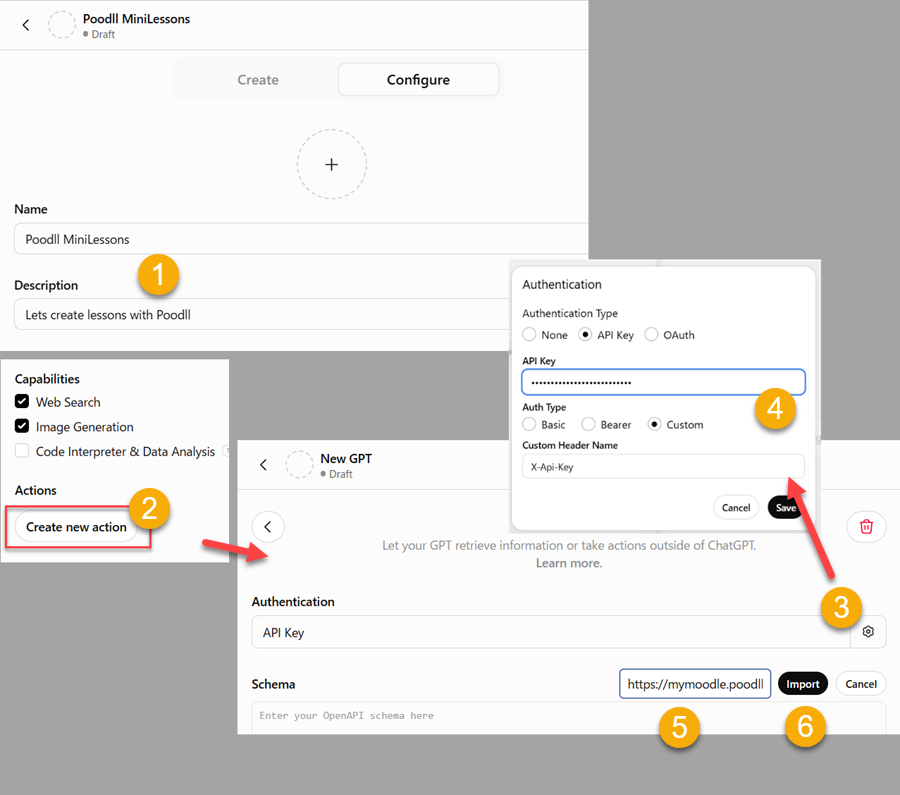
In ChatGPT you can only use MCP via OAuth. But if you can not use OAuth, then you can create a custom GPT and use this to call your MiniLesson AI Generate features.
- In ChatGPT visit: Explore GPTs → Create → Configure
- Give the GPT a name, eg "Poodll MiniLessons"
- Scroll down and select "actions" or "add an action"
- In Scheme, select "Import from URL" and enter: https://[YOUR_MOODLE_URL]/mod/minilesson/openapi.php then press "import"
- In Authentication choose "API Key" and "Custom" then enter:
Custom Header Name: X-Api-Key
API Key: [YOUR_TOKEN] - Instructions, paste the following
You make Poodll MiniLessons via the aigen actions. The API spec embeds detailed guidance under x-agent-instructions (authentication, the template vs. direct-compose workflows, and base_lesson_replication). Follow it for the mechanics. Requests come in three kinds - identify which, then follow the matching workflow: 1. SOURCE MATERIAL (an uploaded PDF/doc/image, or a pasted lesson plan) -> reproduce it faithfully as items (direct-compose workflow). OCR images/PDFs yourself first. 2. EXPORTED LESSON AS A TEMPLATE (the user uploads an exported MiniLesson, or asks to base new lessons on an existing one) -> base_lesson_replication: keep each item's type, layout, options and settings; rewrite only the wording per topic; DROP the old base64 images (they belong to the original topic); let audio regenerate from the new text (do not supply audio files). To reuse a lesson already on the site, pull it first with aigen_export_items_json. 3. A DESCRIBED LESSON ("a speaking/listening lesson on comparatives, food theme") -> check aigen_list_templates FIRST and use a template if one fits (templates can generate text, questions and media server-side). Only hand-compose if none fits. Shared steps once you know the content: - POST /aigen_list_itemtypes to see item types (only hasimportdocs=true types can be hand-composed); POST /aigen_fetch_item_type_details {"itemtype":"..."} for each type you will compose, and follow its field spec exactly. - POST /list_courses and confirm the target course (ask if unclear). - POST /aigen_create_empty_lesson {"courseid":...,"title":"..."} to get a cmid. - Then either POST /aigen_import_items_json {"cmid":...,"itemsjson":"<{items:[...]} as a string>"} for composed items, or the template workflow (aigen_create_add_items_ to_lesson + poll aigen_fetch_create_items_status) for generated content. - After import, read the per-item errors array; fix and resubmit ONLY the rejected items (never resubmit ones that already imported). Report the lesson/cmid and anything you could not represent. Rules: - Never invent field names or values; re-read the spec if unsure. - Prefer the tts fields over uploading audio; the server generates that audio. - When a template and direct compose would both work, prefer the template unless the request needs verbatim fidelity or item-by-item control. |
Test it by asking you which courses you (the webservice user ) are enrolled in.